Translate this page into:
Venous Access for Cardiovascular Procedures
Lalita Nemani, DM Cardiology, Associate Professor Department of Cardiology, Nizam's Institute of Medical Sciences Hyderabad 500082, Telangana India drlalita775@gmail.com
This article was originally published by Thieme Medical and Scientific Publishers Private Ltd. and was migrated to Scientific Scholar after the change of Publisher.
Abstract
Abstract
Venous access is an integral and essential part of cardiovascular interventions for both diagnostic and therapeutic procedures, and it can be lifesaving in cardiac emergencies. Peripheral venous access though simple can sometimes be not achieved for multitude of reasons; hence, knowledge of central venous access is important and is an integral part of cardiac interventional training.
Keywords
cardiovascular procedures
venous access
central venous access
femoral venous access
J-tip guidewire

Introduction
Venous access is an integral and essential part of cardiovascular interventions for both diagnostic and therapeutic procedures, and it can be lifesaving in cardiac emergencies. Peripheral venous access through simple can sometimes be not achieved for a multitude of reasons; hence, knowledge of central venous access is essential and is an integral part of cardiac interventional training.
Central Venous Access
The three main routes of central venous access are (Fig. 1):

-
Fig. 1 Central venous access sites.
Fig. 1 Central venous access sites.
-
Femoral venous access
-
Internal jugular venous (IJV) access
-
Subclavian venous access
Femoral Venous Access
Anatomy
The common femoral vein is predominantly a deep vein of the lower limb present in the femoral triangle where it lies superficial before entering the pelvis beneath the inguinal ligament to continue as an external iliac vein. The femoral triangle is formed in the inguinal-femoral area by the inguinal ligament superiorly, adductor longus medially, and sartorius muscle laterally. The neuromuscular bundle in the triangle consists of the femoral vein, artery, and nerve from medial to lateral (Fig. 2A). Whereas the femoral vein lies just medial to the artery within the femoral sheath, the nerve lies outside it. Distally in the limb, the femoral vein lies posterior to the artery, and an attempt to cannulate the vein usually results in an ardent arterial puncture. Hence one should avoid this low a venipuncture.

-
Fig. 2 (A) Anatomy of femoral vein. (B) Surface markings of femoral vein.
Fig. 2 (A) Anatomy of femoral vein. (B) Surface markings of femoral vein.
Surface Markings
The femoral artery lies at the midinguinal point (Fig. 2B) that corresponds to the central point of the imaginary line connecting the symphysis pubis and anterior superior iliac spine.1 The femoral vein lies approximately 1 and 0.5 cm medial to the femoral artery impulse in adults and children, respectively.2 The femoral vein is identified by localizing the maximal arterial pulsations just beneath the inguinal ligament and puncturing the skin 1 cm below and 0.5 cm medial to it. Some operators rely on the location of the inguinal skin crease to position the skin nicks, but the position of the skin crease itself can be misleading in obese patients. Localization of the skin nick can be done under fluoroscopic guidance, and the nick should overlie the inferior border of the femoral head.
Patient Preparation
-
A wide skin preparation involving the anterior and medial surface of the proximal thigh with extension above the inguinal ligament is required.
-
The hair in this area should be clipped or shaved, preferably the former.
-
The proposed puncture site should be cleaned with alcohol and povidone-iodine or chlorhexidine swab. Chlorhexidine is preferred as the antimicrobial effect lasts longer, nearly 6 hours.
-
The puncture site should be isolated with sterile drapes.
Procedure
Limb Position and Anesthesia
-
Infiltrate the skin and subcutaneous tissue with about 5 to 10 mL of 1% lidocaine, using a 26-gauge needle. Anesthesia may be omitted in an obtunded patient in an emergency.
-
The patient should be in a supine position with a hip in a neutral position. The targeted leg may be abducted and externally rotated about 15 degrees to open the femoral triangle.
Operator Position
The operator is usually on the same side of the puncture side with the patient table at a comfortable height. Some operators prefer to reach out across the patient to the contralateral side.
Technique
-
A. Seldinger technique 3 : The puncture site should be identified using the landmarks as mentioned above. The femoral puncture needle (20–22 gauge) should be attached to a 5 mL/10 mL syringe partially filled with saline. The needle should be held at 45-degree angle, and the puncture should be done slowly aiming toward the umbilicus with constant negative suction. Once the vein is punctured, which can be confirmed by dark colored blood tricking out of the needle, the short guidewire (flexible guidewire with J-tip) is introduced. It is safe to confirm the vessel punctured to be vein by fluoroscopy wherein the ascent of the short guidewire will be along the medial aspect of the spine without crossing the midline in contrast to artery wherein the wire crosses the midline.
Resistance while advancing the guidewire could be due to:
-
Needle dislodgement
-
Compression of guidewire against the vessel
-
Anatomical obstruction
○ Rotating the needle and/or guidewire to reorient the J-tip may help by removing impingement on the vessel wall.
○ If resistance persists, remove guidewire and aspirate free blood to reconfirm intraluminal position of the needle.
○ Reducing the angle of the needle to skin might facilitate the advancement of a guidewire.
○ Continued resistance indicates misplacement of the needle and/or wire.
○ Withdraw the needle and guidewire and attempt fresh. Never use force to advance the wire.
Once an intravenous position is confirmed, thread the needle back over the wire and remove it. Make a skin nick medial to the wire with a No. 11 scalpel to permit easier passage of the dilator cum sheath. Thread the femoral sheath over the wire and reconfirm position by aspirated free venous blood and flush with normal saline to ensure it is air free.
At the bedside, the intraluminal position of the catheter can be confirmed by the FLUSH (Flush the Line and Ultra Sound the Heart) test.4 In this, visualization of agitated saline within the heart via subxiphoid ultrasonic view while the central catheter is flushed confirms the accuracy of venous line placement.
-
B. Ultrasound-guided: In a difficult case, ultrasound guidance can be considered for identification of insertion site. According to a 2015 Cochrane review,5 plain two-dimensional ultrasound guidance of vein puncture scored slightly over the anatomical technique of femoral vein puncture in terms of safety and quality. However, no such conclusion could be made regarding Doppler ultrasound guidance.
-
In the cath lab, the direct venous puncture can be done medially to the femoral artery identified by a handheld Doppler.
-
Alternatively, a duplex ultrasound (7.5 MHz) with a visual display can be used.6
Indications
Diagnostic
-
Right heart study
-
Electrophysiologic (EP) study
Therapeutic
-
Temporary pacemaker insertion (TPI):
○ Femoral venous access is the most common and preferred access for TPI in emergency mainly because of the ease of access
-
Device closure in congenital heart diseases:
○ Atrial septal defects (ASD)
○ Patent ductus arteriosus (PDA)
-
Interatrial septal puncture to gain access into left atriu
○ Percutaneous balloon mitral valvotomy (PBMV)
○ Left atrial appendage closure
○ Radiofrequency ablation (RFA)
-
Inferior vena cava (IVC) filter placement
-
Emergency venous access during cardiopulmonary resuscitation (CPR) or hypotensive patients
-
Central venous pressure monitoring
-
Urgent or emergency hemodialysis access
-
Hemoperfusion access in patients with severe drug overdose
Contraindications
-
Absolute contraindications
○ Venous injury at the level of femoral veins or proximal
○ Known or suspected thrombosis of femoral or iliac veins on the proposed side of cannulation
○ Ambulatory patient—the risk of catheter fracture and migration
-
Relative contraindications
○ Bleeding disorders
○ Distorted anatomy of veins
○ Previous long-term venous catheterization
○ History of vasculitis
|
Vascular |
Nonvascular |
|---|---|
|
Inadvertent arterial puncture |
Infection |
|
Pseudoaneurysm |
Bowel penetration/bladder injury |
|
Arteriovenous (AV) fistula |
Psoas abscess |
|
Hematoma—due to arterial puncture or venous perforation; rarely retroperitoneal hemorrhage |
Femoral nerve injury—paresthesias |
|
Thrombosis of the femoral or iliac veins or other veins of the lower limbs |
Septic arthritis—esp. in children due to puncture and contamination of hip capsule |
|
Complication |
Rate (%) |
|---|---|
|
Vascular complications—diagnostic cardiac catheterization |
0.40 |
|
Interventional cardiac procedures |
|
|
a. Femoral access hematoma (> 6 cm) |
5–23 |
|
b. Retroperitoneal hematoma |
0.15–0.44 |
|
c. Pseudoaneurysm |
0.5–6.3 |
|
d. Arteriovenous fistula |
0.2–2.1 |
|
e. Infection |
< 0.1 |
Advantages
-
Gaining access in emergencies and patients in shock is relatively easier.
-
The femoral area is relatively free of other monitoring devices and proves advantageous in a critically ill patient.
-
The femoral access is preferable in a bedridden patient as it allows free movement of arms and necks without interrupting the access lines.
-
Femoral access precludes the development of hemothorax/pneumothorax and is preferred to other vascular sites in patients with severe coagulopathy or respiratory failure.
Disadvantages
The femoral site is potentially contaminated because of its proximity to the perineal region. Catheter-related bloodstream infections (CRBSIs) were less with jugular and sub-clavian access than with femoral according to earlier studies. However, subsequent studies from 2008 to 2010 showed no difference among the three sites regarding CRBSIs.11
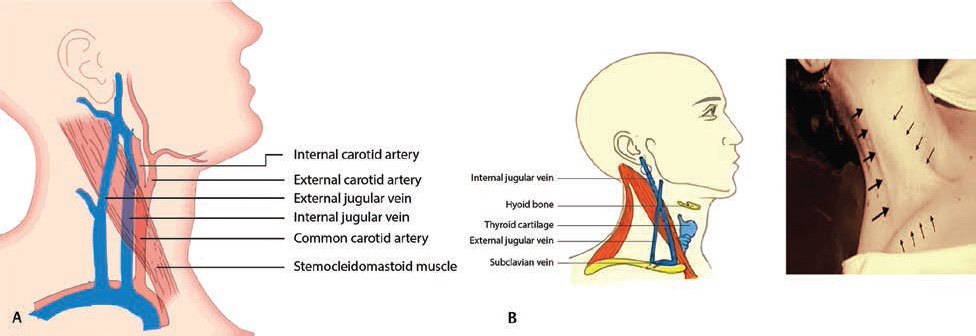
Internal Jugular Venous Access
Anatomy
Internal jugular vein is not visible externally. It originates from the jugular foramen at the skull base as the continuation of the sigmoid sinus. It ends behind the sternoclavicular joint where it joins the subclavian vein. It runs along with the carotid artery and vagus nerve in the carotid sheath throughout its entire course. The IJV is initially posterior, then lateral, and finally anterolateral to the carotid during its course. At the level of the cricoids cartilage, it lies beneath the sternocleidomastoid muscle and emerges at the apex of the triangle formed by the sternal and clavicular heads of the muscle (Fig. 3).

-
Fig. 3 Anatomy of internal jugular vein.
Fig. 3 Anatomy of internal jugular vein.
The right IJV is preferable for cannulation over the left IJV due to the following reasons:
-
It is larger in caliber.
-
It is relatively straight while the left IJV takes right-angled turns before entering the right atrium; thus, it increases the chances of vessel rupture leading to hemothorax.
-
The left IJV lies anterior to the thoracic duct. Thus right IJV is preferred to avoid any ductal injury.
-
The dome of the right pleura is relatively lower, hence fewer chances of pneumothorax.
-
Relative ease for a right-handed operator.
Surface Landmarks
The IJV runs from the earlobe to the medial clavicular border,12 between the sternal and clavicular heads of the sternocleidomastoid muscle. It is easier to cannulate the IJV below the level of cricoid cartilage as tributaries join in the upper neck. The common carotid artery travels adjacent the IJV and is a useful landmark to locate the IJV. There is a slight gap between the right IJV and carotid artery while the left IJV overlays the carotid artery.
The anterior, central, and posterior are three main approaches to cannulate the IJV. These approaches are named according to the relationship with the sternocleidomastoid muscle. The central approach is preferred.
Approaches
-
Central—most common and preferred approach
-
Anterior
-
Posterior (Table 3)
|
Central (Fig. 4A) |
Anterior (Fig. 4B) |
Posterior (Fig. 4C) |
|
|---|---|---|---|
|
Landmark |
The superior apex of the triangle formed by two heads of sternocleidomastoid and clavicle |
The medial edge of sternocleidomastoid at the level of the thyroid cartilage |
The lateral edge of sternocleidomastoid, 1/3 of the way from clavicle to mastoid process |
|
Angle with skin (in degrees) |
30 (child), 45–60 (adult) |
30 (child), 45 (adult) |
30–45 |
|
Aim toward |
Ipsilateral nipple |
Ipsilateral nipple |
Sternal notch |
|
IJV depth in adult |
Within 3 cm |
Within 3 cm |
Within 5 cm |

-
Fig. 4 (A) Central approach of IJV puncture. (B) Anterior approach to IJV puncture. (C) Posterior approach to IJV puncture.
Fig. 4 (A) Central approach of IJV puncture. (B) Anterior approach to IJV puncture. (C) Posterior approach to IJV puncture.
Patient Preparation and Position
-
A wide area including the skin and chest up to the nipples should be draped sterile.
-
The patient should be in supine position; Trendelenburg's position with 10 to 15 degrees head down is preferred if tolerated to make the IJV prominent.
-
The neutral position of the head is best to separate the IJV and carotid artery to avoid accidental arterial puncture.
-
Some recommend turning the head slightly to the opposite side to make the heads of the sternocleidomastoid prominent. However, in this position, the vessels overlap and the IJV diminishes in diameter.
In a trial of 650 patients, assigned randomly to neutral versus turned (45 degrees) during ultrasound-guided cannulation of the IJV, technical success was 100% with no significant difference in complications between the two groups.
-
Anesthetize the area with 10 mL of lidocaine aspirating and ensure that the IJV or carotid is not touched. A 25-mm needle is used for this purpose. The same needle attached to a 2- to 5-mL syringe can be used to localize the IJV.
Anatomical Landmark Technique
Finder Needle Technique
The small “finder” needle attached to a 2- to 5-mL syringe is inserted through the skin puncture site previously chosen. Advance the needle at a 30- to 60-degree angle to the skin while applying negative pressure to the syringe. A flash of blood signifies that the needle tip is within the vein. Note the depth and location of the vein. Remove the finder needle. Alternatively, the finder needle may be left in place for reference.
Seldinger Technique
The introducer needle attached to a 10-mL saline syringe is now inserted at the localized site and slowly advance while aspirating. The appearance of free blood in the syringe indicates the needle is in vein. The vein usually is entered 1 to 3 cm depth. If missed, the needle should be withdrawn up to the skin and redirected. Once venous blood free flowing is confirmed, pass the J-tip guidewire. If resistance is encountered, remove the wire, confirm the intravenous position of a needle by aspirating free-flowing venous blood, and repass the guidewire. Once the guidewire is in position, remove the needle and thread the sheath over the wire. Finally, remove the guidewire and aspirate blood to confirm the intraluminal position of the sheath tip. Obtain a chest radiograph to confirm the position of the sheath tip in the IJV and ensure no trauma to adjacent structures.
Ultrasonographic Guidance13
Ultrasound can be used to localize the insertion site for the IJV. In a 2009 study, 64% of residents who participated had penetrated the posterior wall of the IJV even under ultrasonographic guidance. Srinivasan et al14 studied 170 adults who underwent IJV cannulation either by anatomic landmarks or by real-time ultrasonography. Ultrasonic guidance reduced the incidence of inadvertent arterial puncture and reduced the number of attempts for successful cannulation but did not eliminate posterior venous wall penetration.
The anatomical landmark technique had successful cannulation of 85 to 99%, with similar rates with prelocation technique. Success rate with real-time ultrasound imaging is 94 to 100%.15
Indications
-
TPI
-
Venous access—fluid resuscitation, infusion of hypertonic solutions, temporary dialysis
-
Venous access for pulmonary artery catheterization
-
Device closure—post–myocardial infarction (MI) VSD cases
Contraindications
There are no absolute contraindications. Relative contraindications are:
-
Mechanical problems in access of the neck-skin trauma, infection, scar, mass
-
Coagulopathy
-
Patient non-cooperation
Complications
-
Infection
-
Pneumothorax—when the apex of the lung is punctured
-
Hemothorax—especially if a venopleural fistula is created
-
Chylothorax occurs if the thoracic duct is injured
-
Cerebrovascular accident (CVA)—when the carotid artery is punctured inadvertently due to interruption of blood supply to the brain or due to embolization
-
Hematoma
-
Airway compression—due to hematoma
-
Air embolism—if the catheter lumen is left open to the air during insertion
-
Arrhythmia—if the catheter tip irritates the right ventricle
-
Thrombosis
Subclavian Venous Access
Anatomy
The axillary vein courses medially to become the subclavian vein as it passes anteriorly to the first rib. The subclavian vein forms the brachiocephalic trunk after joining the internal jugular vein. After crossing the first rib, the vein lies posterior to the medial third of the clavicle at the change in curvature of the clavicle (Fig. 5). Deep to the vein is the anterior scalene muscle followed by the subclavian artery (Fig. 5). The thoracic duct joins the junction of the left internal jugular vein and left subclavian vein, which can get punctured while cannulating the left subclavian vein; hence, the right subclavian vein is preferred for central venous access. The subclavian artery lies posterior to the vein.

-
Fig. 5 Anatomy of subclavian vessels.
Fig. 5 Anatomy of subclavian vessels.
Approaches16
-
Infraclavicular
-
Supraclavicular (Table 4)
|
Infraclavicular (Fig. 6A) |
Supraclavicular (Fig. 6B) |
|
|---|---|---|
|
Entry site |
Just inferior to the clavicle at the midclavicular line muscle |
1 cm lateral to the clavicular head of the sternocleidomastoid, 1 cm posterior to the clavicle |
|
Needle orientation |
Close to the coronal plane |
Tip aimed 10 degrees anterior to the coronal plane |
|
Needle direction |
Just posterior to the sternal notch |
Contralateral nipple |
|
Distance between the skin and sub-clavian vein |
3–4 cm |
2–3 cm |
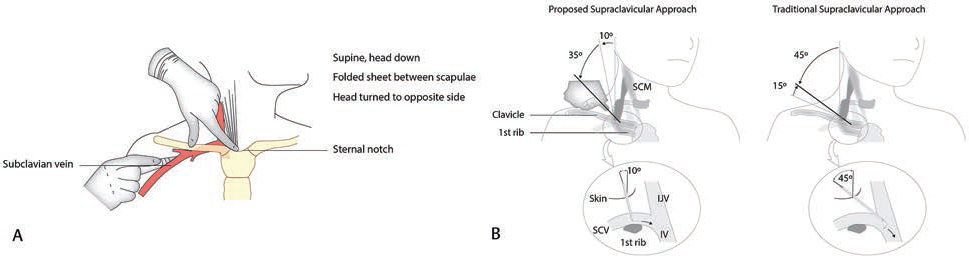
-
Fig. 6 (A) Intraclavicle approach to subclavian vein puncture. (B) Supraclavicle approach to subclavian vein puncture.
Fig. 6 (A) Intraclavicle approach to subclavian vein puncture. (B) Supraclavicle approach to subclavian vein puncture.
Indications
-
Tembporary pacing
-
Permanent pacemaker insertion
-
Chemo port—to deliver chemotherapy drugs
Contraindications
Contraindications exist in coagulopathies and in patients receiving thrombolysis as the subclavian vein cannot be compressed.
Complications17
-
Infection.
-
Pneumothorax—when the lung is punctured. This is the most dreaded complication, and subclavian venous access should not be attempted if the facilities to manage this complication are not available.4
-
Hemothorax—especially if a venopleural fistula is created.
-
Chylothorax occurs if the thoracic duct is injured especially on the left side.
-
Air embolism—if the catheter lumens are left open to the air during insertion.
-
Arrhythmia—if the catheter tip irritates the right ventricle.
-
Thrombosis.
-
Brachial plexus injury.
Summary
Central venous access is necessary for patients who are critically ill and have chronic diseases. Central venous access should be attempted only in cases where the option of peripheral venous access is exhausted as it carries a relatively higher risk to the patients.18
Femoral venous access is the preferred approach in emergencies because of ease of access, especially in situations where CPR is being carried out because CPR need not be stopped. The risk of immediate life-threatening complications is less.
Internal jugular vein access is a good approach, as the complications are lower than the subclavian approach. The central approach is the preferred approach, and the finder needle technique is useful, especially with less experienced operators.
Subclavian venous access is the preferred approach in patients requiring long-term central venous access. The infraclavicular approach is the preferred approach.
Peripheral Venous Access
The peripheral venous access includes the
-
Axillary vein
-
External jugular vein (EJV)
-
Veins of the upper extremity
-
Veins of the lower extremity
Axillary Vein Access
Axillary vein is now a preferred venous route in cardiac interventions, especially for implantation of pacemakers and defibrillators. The axillary vein is large, can accommodate multiple leads, and is easily accessed. This route scores over the subclavian vein access in terms of lesser complications. Axillary vein access denotes any venous access lateral to the medial border of the first rib.
Anatomy
The axillary vein is the continuation of the basilic vein. It begins at the lower end of the Teres major muscle and terminates beneath the clavicle at the outer border of the first rib where it continues as subclavian vein. It is accompanied by the axillary artery, which is slightly lateral and posterior to the vein. It is covered anteriorly by the pectoralis minor, major and clavipectoral fascia. The pectoralis major crosses the axillary vein anteriorly and divides it into three parts: proximal, posterior, and distal. As one moves laterally toward the rib cage, the axillary vein and artery are separated and further away from the rib cage. This anatomical site is suited for venous access, despite the relatively small caliber of the vein at the site. The depth of the vein and lack of obvious surface landmarks suggest that ultrasound should be used for access (Fig. 7).

-
Fig. 7 Anatomy of axillary vein.
Fig. 7 Anatomy of axillary vein.
Surface Landmarks
The clavicle, coracoid process, and deltopectoral grove are important landmarks for axillary vein localization. The coracoid process is the bony prominence palpated on the anterior should, and deltopectoral groove is the crease there formed by the lateral border of the pectoralis major muscle and medial border of the deltoid muscle. Axillary artery pulsations can be felt in the superior part of the deltopectoral groove, and the vein lies anterior and medial to it. The clavicle also helps in localizing the vein that lies in the infraclavicular space just before it rolls over the first rib.
Techniques
-
Blind landmark technique: First suggested by Nickalls in 1987.19 It aims at the infraclavicular portion of the axillary vein.
○ The needle is inserted three finger breadth below the coracoid process slightly lateral to the lateral border of pectoralis minor.
○ The needle is directed toward a point below the medial end of the clavicle, that is, the palpable space between the clavicle and thorax.
○ This corresponds to the junction of medial and lateral three-quarters of the clavicle. Successful cannulation was done in 96%. Belott described the same with slight modification.
○ Advance needle 1 to 2 cm medial to the deltopectoral grove in a superior and medial direction parallel to the groove.
However, this method failed to gain widespread recognition due to anatomical reliability of the vein and its surface landmarks. Ultrasound or fluoroscopic guidance approach to axillary vein puncture is advocated.
Fluoroscopy-guided low approach 20 : First rib guidance (Fig. 8). Fluoroscopy-guided lateral approach—via the rib cage margin (Fig. 8).
○ First rib approach fluoroscopy guided: The axillary vein to be punctured at the juncture where the clavicle crosses the first rib. Needle is inserted still below, at 45 to 60 degrees to body surface along the greater curvature of the first rib, toward the root of the neck. One should not advance the needle beyond the medial border of the first rib. If the vein is entered, blood could be aspirated. If the bone is hit, withdraw and reorient the needle slightly anterior or posterior, that is, walking through the rib technique.
○ Rib cage approach fluoroscopy guided: The axillary vein is punctured at the lateral edge of the rib cage at the confluence of the second and third ribs. This is the preferred method of puncture, as axillary vein appears to lie across the rib cage at this site in a relatively constant fashion.21
Ultrasound-guided: Use the ultrasound probe in a sterile cover to obtain an image of both the axillary vein and artery. Position the needle at the point where the probe meets the skin and advance under direct observation.

-
Fig. 8 Fluoroscopic-guided axillary vein puncture.
Fig. 8 Fluoroscopic-guided axillary vein puncture.
Indications
-
Placement of pacemaker leads, defibrillation leads
-
Venous access for placing temporary pacing wire, pulmonary catheters
-
Placement of dialysis catheters
Contraindications
-
Absolute contraindications
○ Ipsilateral lymphedema, cellulitis, radical lymph node resection
○ Ipsilateral venous system occlusion
-
Relative contraindications
○ Ipsilateral mastectomy
○ Ipsilateral arteriovenous fistula
Patient Position and Preparation
-
The patient lies supine, Trendelenburg's position if feasible.
-
A rolled towel between the scapula would push the lateral ends of the clavicle posteriorly and give better access to the axillary vein.
-
Local anesthesia with 1% lidocaine is usually sufficient.
Complications
Relatively less in experienced hands.
○ Pneumothorax
○ Hemothorax
○ Arterial injury
○ Arteriovenous fistula
○ Hematoma, bleeding, thrombus, and infection
Cannulation of the axillary vein by infraclavicular approach is a safe and attractive option as the site is clean and comfortable for the patient, lesser risk of pneumothorax, hemothorax, and chylothorax. In the event of inadvertent arterial puncture, external pressure can be safely applied with a more lateral approach.
External Jugular Vein Access
External jugular vein cannulation is an approved technique associated with minimal complications but frequent failure rates.
Anatomy
External jugular vein begins at the angle of the mandible and runs obliquely across the sternocleidomastoid up to the middle of the clavicle (Fig. 9). It is covered by platysma and superficial fascia and is separated from the sternocleidomastoid by the deep fascia.
-
Fig. 9 (A) Anatomy of extrajugular vein. (B) Surface marking of extrajugular vein.
Fig. 9 (A) Anatomy of extrajugular vein. (B) Surface marking of extrajugular vein.
Patient Position and Preparation
Trendelenburg's position with the head slightly is tilted to the opposite side. Light pressure above the clavicle helps engorge the EJV and facilitate cannulation.22
Technique
-
The site of puncture should be proximal, far away from the clavicle.
-
Apply sterile drape (2% chlorhexidine or 70% alcohol).
-
Infiltrate 0.5 to 1.0 mL of lidocaine to raise a wheal at the site.
-
Stabilize the skin over the desired puncture site with the nondominant thumb and pierce the EJV at 10 to 25 degrees.
-
Once blood appears in the chamber, the angle should be reduced to avoid puncture of the posterior wall of the vein. Advance the needle another 2 to 3 mm into the vessel.
-
The catheter is introduced directly over the needle or by Seldinger technique. The use of the Seldinger J-wire has increased successful cannulation of the EJV from 50 to 79–90%.
-
In case of failed cannulation, withdraw the needle up to the skin and retry.
-
In case of swelling suggestive of hematoma, withdraw the needle and apply compression for 5 minutes (Fig. 10).

-
Fig. 10 EJV puncture.
Fig. 10 EJV puncture.
Causes of cannulation failures are:
-
Difficult passage of the J-wire through the EJV-SCV junction into the thorax
-
Collapse of the vein
-
Inadequate skin traction
-
Incorrect positioning and incorrect angle of penetration
Ultrasound guidance facilitates peripheral venous placement in patients with difficult IV access when veins are not readily visualized or palpable.
Indications
Venous access is done in an emergency for the administration of fluids. Medications are used during resuscitation.
Contraindications
There are no absolute contraindications. Vesicant solutions, irritant solutions such as sclerosing agent, and high-pressure contrast agents should be avoided being injected into the EJV.
Complications
-
Thrombophlebitis—pain, inflammation, and infection
The catheter should be replaced every 3 to 4 days routinely or earlier in case of thrombophlebitis.
-
Inadvertent arterial puncture
Central Venous Access through the External Jugular Vein
Indicated specifically in23:
-
Conversion of an already indwelling peripheral catheter, especially in a critically ill patient who would not tolerate any more invasive procedure
-
In patient requiring long-term total parenteral nutrition (TPN), hemodialysis access, and antibiotics for a longer duration
Absolute Contraindications
-
Overlying skin infection
-
Thrombophlebitis
-
Vein thrombosis
Relative Contraindications
Relative contraindications are lack of approachability to the vein.
Advantages
Safe procedure. No serious complications.
Disadvantages
-
Anatomical factors (acute angle between the EJV and SV; the presence of valves; constriction of the EJV) can make cannulation difficult.24
-
Variability in the course (EJV terminates into a venous plexus in 4%)22 could prove to be challenging.
-
EJV size is inversely proportional to the IJV and could pose a problem for sizing of the device.25
After three unsuccessful attempts, another site should be pursued. Kato et al have suggested that EJV cannulation under CT venography guided is worth the efforts in moribund patients.
Technical success varies from 73 to 86%.26
Upper Extremity Venous Access
Antecubital Access
Cardiac catheterization and fluoroscopy originated with Dr. Werner Forssmann's self-catheterization via the antecubital vein. Upper extremity venous access for right heart cauterization is a safe procedure that scores over traditional femoral or internal jugular access. According to a retrospective study by Shah et al,27 success rates were 91% for antecubital venous access and 96% for proximal venous access for a right heart catheterization. The antecubital access group had a 0% complication rate, whereas the proximal venous access group had 3% complication rate that included inadvertent arterial puncture and hematoma formation.
Advantages
-
Shorter fluoroscopy time
-
Decreased radiation dose
-
Fewer access site complications
-
Decreased time to ambulation
Most procedures through the antecubital access can be performed with only local anesthesia or mild sedation, obviating the need for higher levels of anesthesia. Upper extremity venous access can be a useful access modality for catheterization in both children and adults, especially in pediatric catheterization. This access mode facilitates diagnostic catheterization and quicker recovery times as well as complex interventions.
The antecubital fossa and proximal arm contain three major accessible veins:
-
Cephalic vein
-
Basilic vein
-
Brachial vein
These veins are large and can be easily cannulated. Ultrasound-guided puncture is advocated to avoid arterial and nerve injury.
Anatomy
Cephalic and basilic veins are superficial veins formed from the dorsal venous network on the dorsum of the hand and ultimately drain into the axillary vein. Whereas the cephalic vein runs on the radial aspect of the arm, the basilic vein is along the ulnar aspect. The median cubital vein connects both in the cubital fossa.
The brachial vein is the major deep vein of the arm. It is formed by the joining of radial and ulnar veins in the cubital fossa and ends at the lower end of Teres major muscle (at the lateral border of the scapula on an anteroposterior chest X-ray), where it continues as an axillary vein (Fig. 11).

-
Fig. 11 Anatomy of venous access of upper limb.
Fig. 11 Anatomy of venous access of upper limb.
Surface Anatomy
The cephalic vein begins at the anatomical snuff box, runs across the distal radius to the ventral aspect of the forearm, and ascends on the lateral side of the arm. It pierces the clavipectoral fascia and empties into the axillary vein.
The basilic vein begins at the ulnar side of the wrist runs along the ulnar aspect of the forearm ventrally till the elbow. Above the elbow, it runs medial to the biceps and perforates the deep fascia in the midarm to joins the brachial vein.
Regarding the venous anatomy of the arm, medial is better than lateral and higher is better than lower. Medial position of the brachial vein makes it more suitable as access than the cephalic vein, which forms an acute angle with the subclavian that is difficult to negotiate. The vein becomes larger as we go higher in the arm, making it more suitable for larger devices.
Technique for Brachial Vein Cannulation28 29
Pre-Cath IV
Placing a pre-cath IV in the medial vein of the arm can be done by a nurse in the preparation area. Application of tourniquet above the elbow makes the vein prominent. Veins in the antecubital fossa or distal ones can both be used. A 20-g Angiocath (Becton, Dickinson and Company) can be inserted and sealed with a needleless valve cap and secured with tape. If superficial veins are not visible, ultrasound imaging can be used to identify deep veins.
The sheath insertion requires preparation just as for radial artery access.
Part Preparation
The arm is painted sterile from the fingers to above the elbow. Sterile draping is used to keep the Angiocath-inserted area open for access. For best sterile conditions, change gloves and towels after exchanging the Angiocath for a venous sheath.
Sheath Insertion
-
Inject local anesthesia adjacent to the Angiocath.
-
Remove the cap and introduce a 0.018-in micropuncture guidewire.
-
Pass the guidewire well into the vein. Fluoroscopy and contrast angiography can be used if resistance is met. Usually, change wire angle, and tip bend negotiates the resistance.
-
Once the wire is well into the vein, remove the Angiocath and thread the venous sheath.
-
Remove the dilator and the guidewire. Flush with saline. Do gentle aspiration, as there is low blood flow in the vein. Secure with Tegaderm dressing. Antispasmodics are generally not required. Heparin is not necessary if performing only right heart catheterization.
Difficulty in passing catheters may be encountered, especially when the veins on the radial aspect are selected, such as the cephalic vein. A deep breath or gently saline flushing during advancement may help. Occasionally an angioplasty 0.014-in hydrophilic guidewire may be required to negotiate through the axillary into the subclavian vein.
At the end of the procedure, the sheath can be removed, and a pressure dressing applied. Hemostatic devices are not required as it is a low-pressure venous system.
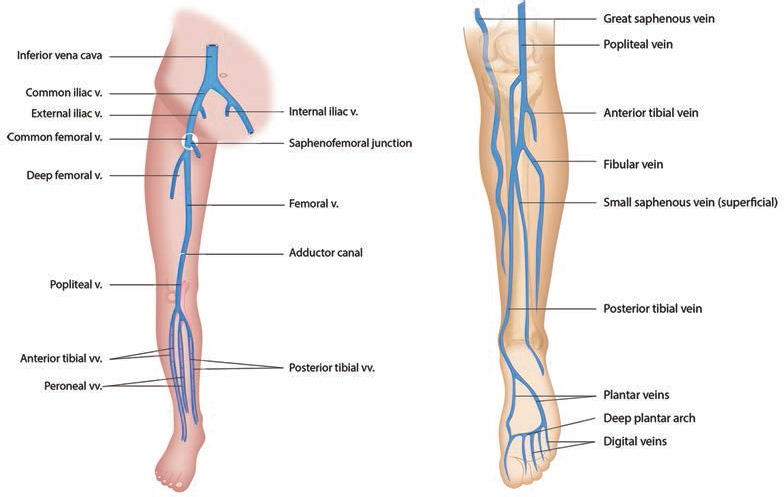
Veins of the Lower Limb
-
Popliteal vein
-
Pedal veins—tibial veins, peroneal veins, small saphenous veins (Fig. 12)
-
Fig. 12 (A) Deep vein of the LL (anterior view). (B) Deep vein of the LL (posterior view).
Fig. 12 (A) Deep vein of the LL (anterior view). (B) Deep vein of the LL (posterior view).
Popliteal Vein
Anatomy
Popliteal vein is formed from the anterior and posterior tibial veins at the lower border of popliteal muscle (the lower aspect of the posterior knee), ascends through the popliteal fossa, and passes through the opening in adductor Magnus to continue as the femoral vein. It always lies between the popliteal artery and the tibial nerve. Distally it is medial to the artery, between the two heads of gastronomes, it is posterior (superficial) to the artery, and proximally it is posterior-lateral to it (Fig. 13).

-
Fig. 13 Surface marking of popliteal vein.
Fig. 13 Surface marking of popliteal vein.
Technique
-
The patient should be in a prone position.
-
Puncturing the vein under direct ultrasonographic visualization is ideal. Alternatively, under fluoroscopy, the needle is directed from the popliteal crease parallel to the vertical axis along with the tibial lateral intercondylar eminence.
-
Further insertion of guidewire and sheath is done as in Seldinger technique.
Indications
-
To treat deep vein thrombosis (DVT) by catheter-guided thrombolysis
-
Endovascular ablation for varicose veins
Tibial Veins
Anterior and posterior tibial veins are deep veins of the lower limb, occur in pairs, and accompany the corresponding artery.
Anatomy
The posterior tibial veins receive blood from medial and lateral plantar veins and drain the plantar surface of the foot and posterior compartment of the leg. It ascends behind the tibia to join the popliteal vein at the lower aspect of the posterior knee. It is joined by the peroneal vein that runs along the posteromedial aspect of the fibula. The anterior tibial veins run along with the anterior compartment of the leg between the tibia and fibula before joining the posterior tibial vein (Fig. 14).
-
Fig. 14 Surface anatomy of anterior tibial vein.
Fig. 14 Surface anatomy of anterior tibial vein.
Procedure
-
The anterior tibial vein can be punctured with the leg in stretched posture in a supine position.
-
The vein can be identified adjacent to the artery anteriorly in the shiny interosseous membrane between the tibia and fibula.
-
The posterior tibial vein can be cannulated either in a prone position or supine position with leg externally rotated.
-
The popliteal vein should be identified by ultrasonography, and the continuation vein on the back of the tibia is the posterior tibial vein. The peroneal vein is the continuation vein behind the fibula.
Indications
Indication is catheter-directed thrombolysis for DVT, especially an extensive iliofemoral DVT that extends through the popliteal veins into the tibial veins.
Pedal veins (tibial veins) offer many advantages over the conventional popliteal approach. Patient comfort and safety are major benefits.
-
Less restriction of movements.
-
Complications are less. Bleeding is insignificant and easily controlled by manual pressure at the ankle
There are no contraindications to using pedal access.
Limitations: sheath size should be no larger than a 6F sheath.
Small Saphenous Vein
This superficial vein is often used for venous access in infants and children.
Anatomy
Small saphenous vein is found half to one finger breadth lateral (anterior) to the lateral malleolus (Fig. 15).

-
Fig. 15 Venous puncture site for small saphenous vein.
Fig. 15 Venous puncture site for small saphenous vein.
Procedure
-
It can be cannulated by direct visualization or blind technique.
-
The patient lies in the supine position with leg externally rotated. A tourniquet is applied just below the knee.
-
The vein is cannulated at the level of the medial malleolus. Skin is penetrated at around 30 degrees and needle directed toward the upper two-thirds of the calf. If now blood is evident, slightly withdraw and watch for blood in the needle hub on exiting the vein. It unsuccessful, reattempt slight medially or laterally. If blood flashback into the hub is seen, advance the needle 2 to 3 mm further before connecting the over needle catheter or passing the wire.
Indications
-
Often used for IV access in children and infants
-
As a last option for catheter-directed thrombolysis of DVT when no other access is available (as the vein joins the popliteal vein)
Conclusion
The axillary vein is preferred over subclavian vein access for pacemakers and defibrillators. Antecubital venous access is the preferred mode for right heart catheterization in both children and adults owing to its ease and safety. Though popliteal venous access is the conventional approach for endovascular treatment of iliofemoral venous occlusion, tibial and other pedal venous access holds promising, especially in the treatment of extensive DVT involving the popliteal and lower down vessels.
Conflicts of Interest
None declared.
References
- Central venous access and central venous pressure monitoring.Textbook of Pediatric Emergency Procedures. Baltimore, MD: Williams & Wilkins; 1997. p. :251-278. In: eds.
- [Google Scholar]
- Catheter replacement of the needle in percutaneous arteriography; a new technique. Acta Radiol. 1953;39(05):368-376.
- [Google Scholar]
- The FLUSH study—flush the line and ultrasound the heart: ultrasonographic confirmation of central femoral venous line placement. Ann Emerg Med. 2014;63(06):678-683.
- [Google Scholar]
- Ultrasound guidance versus anatomical landmarks for subclavian or femoral vein catheterization. Cochrane Database Syst Rev. 2015;1:CD011447.
- [Google Scholar]
- Ultrasound guidance for vascular access. Emerg. Med Clin North Am. 2004;22(03):749-773.
- [Google Scholar]
- Central venous catheters.Irwin & Rippe's Intensive Care Medicine. (8th ed.). Philadelphia, PA: Wolters Kluwer; 2018. p. :36-49. In: eds.
- [Google Scholar]
- Complications of central venous catheterization in critically ill children. Pediatr Int. 2007;49(05):593-599.
- [Google Scholar]
- Mechanical complications of central venous catheters. J Intensive Care Med. 2006;21(01):40-46.
- [Google Scholar]
- Cardiac catheterization 1990: a report of the registry of the Society for Cardiac Angiography and Intervention. Cathet Cardiovasc Diagn. 1991;24(02):75-83.
- [Google Scholar]
- The risk of catheter-related bloodstream infection with femoral venous catheters as compared to subclavian and internal jugular venous catheters: a systematic review of the literature and meta-analysis. Crit Care Med. 2012;40(08):2479-2485.
- [Google Scholar]
- Central venous catheterization: internal jugular approach and alternatives.Clinical Procedures in Emergency Medicine. (2nd ed.). Philadelphia, PA: Saunders; 1991. p. :340-351. In: eds.
- [Google Scholar]
- Incidence of posterior wall penetration during internal jugular vein cannulation: a comparison of two techniques using real-time ultrasound. Indian J Anaesth. 2017;61(03):240-244.
- [Google Scholar]
- A randomized trial of ultrasound image-based skin surface marking versus real-time ultrasound-guided internal jugular vein catheterization in infants. Anesthesiology. 2007;107(05):720-724.
- [Google Scholar]
- A comparison of the supraclavicular approach and the infraclavicular approach for subclavian vein catheterization. Ann Emerg Med. 1986;15(04):421-424.
- [Google Scholar]
- Pneumothorax following supraclavicular subclavian venepuncture. Anaesthesia. 1969;24(03):453-460.
- [Google Scholar]
- Central vein catheterization. Failure and complication rates by three percutaneous approachesArch Intern Med. 1986;146(02):259-261.
- [Google Scholar]
- A new percutaneous infraclavicular approach to the axillary vein. Anaesthesia. 1987;42(02):151-154.
- [Google Scholar]
- The first rib as a fluoroscopic marker for subclavian vein access. J Vasc Interv Radiol. 1995;6(04):619-622.
- [Google Scholar]
- A randomized, crossover comparison of injected buffered lidocaine, lidocaine cream, and no analgesia for peripheral intravenous cannula insertion. Ann Emerg Med. 2009;54(02):214-220.
- [Google Scholar]
- Evaluation of the technique of central venous catheterisation via the external jugular vein using the J-wire. Anaesth Intensive Care. 1985;13(02):131-133.
- [Google Scholar]
- External jugular vein catheterization using ‘intra-atrial electrocardiogram’. Yonsei Med J. 2009;50(02):222-226.
- [Google Scholar]
- Distribution and morphology of valves in the human external jugular vein: indications for utilization in microvascular anastomosis. J Oral Maxillofac Surg. 1996;54(07):879-882.
- [Google Scholar]
- External jugular venous route for central venous access: our experience in 563 surgical patients. J Anesth Clin Res. 2011;2(06):1-5.
- [Google Scholar]
- Right heart catheterization using antecubital venous access: feasibility, safety and adoption rate in a tertiary center. Catheter Cardiovasc Interv. 2014;84(01):70-74.
- [Google Scholar]
- The Cardiac Catheterization Handbook. (5th ed.). Philadelphia, PA: Elsevier; 2011. ed.
- [Google Scholar]
- Forearm vein access for radial procedures: an easy method for right and left heart catheterization. Cathlab Digest. 19 12
- [Google Scholar]